Once you learn the concept you can join as many as you like!
Just a quick note that some digital stamp companies have an angel policy that if you do merge images then you must only use theirs together.
THE SINGLE MOST IMPORTANT POINT TO REMEMBER IS TO MAKE A COPY OF YOUR IMAGE, NEVER EDIT THE ORIGINAL!!!
Simply open your image and press control & c then click EDIT -> PASTE AS NEW IMAGE
There are generally 2 formats of images you may download, one is PNG format and the other is JPG or TIF, they work slightly different so I'll cover both separately. If you don't get things right the first time don't worry just click the back (EDIT->UNDO) button or try again :)
For this tutorial I am using Sam in Trouble and Jill Two by Mo Manning (with permission)
Click the pictures for a larger view.
Click the pictures for a larger view.
STEP 1
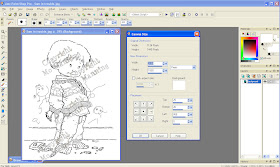
Working on your copy of your image increase the canvas size to where you want your image to go, here I will be placing it to the left so click IMAGE ->CANVAS SIZE and adjust. It shows the current canvas size at the top so you know how much to adjust by.
You can also create a new image and copy and paste your first image into it.
STEP 2 (Optional)
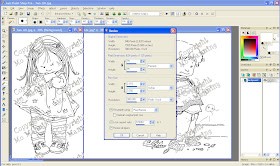
You can resize your 2nd image to fit. To do this open your 2nd chosen image and click IMAGE ->RESIZE. Here I adjusted to 75%
STEP 3
You'll notice which image to work on by which one is highlighted blue at the top as now you will be flicking between them.
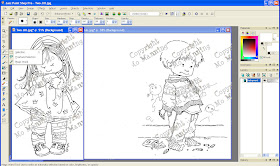
Working on Jill your 2nd image go to your tool menu and click on the SELECTION TOOL. Drop down the menu and select MAGIC WAND as shown in the pic below. Now click on the WHITE AREA next to your image of Jill. This will put 'runing ants' around the image and the page edge.
STEP 4
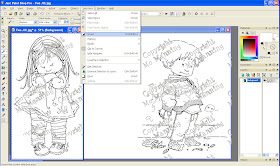
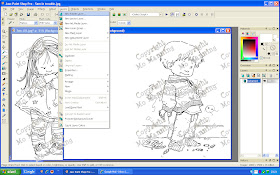
Next click on SELECTIONS which is on the top tool bar as shown below then SELECTIONS ->INVERT.
Make a copy of this by clicking EDIT ->COPY
STEP 5
Now move over to your 1st image (Sam in Trouble) by clicking on the blue bar above the image. When on this image you need to make a new layer so do this by clicking LAYERS ->NEW RASTER LAYER and click OK.
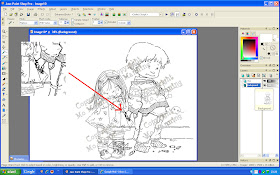
Next click EDIT ->PASTE ->PASTE AS TRANSPARENT SELECTION and your copied image of Jill will appear on your 1st image.
STEP 6
Your image will be floating so slot it where you would like it and right click your mouse. If you wish to move it again then click on the MOVE tool on the sidebar which looks like a cross above the magic wand. As you can see on the image below the images are over each other but you can still see your 1st image through
Click SELECTIONS ->SELECT NONE
STEP 7
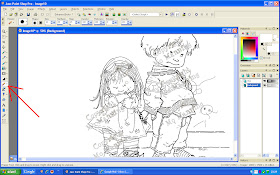
This is the clever bit and takes a bit of practice! Click on the ERASER tool on the side tool bar as shown in the pic below. The eraser menu will appear above the images so look at size, hardness, density etc at the top. Set opacity to 100% and adjust the size of the eraser head, this is trial and error, I chose 18.
You also need to make sure your background colour is set to white which is on the right of the screen (Image below) Click onto it to change the colour. Now working on the layers click onto background (which is your 1st image)
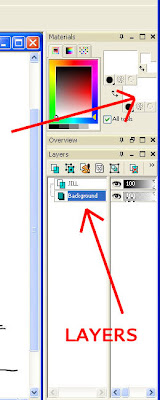 As you have selected background on your layers panel when you erase it will not touch the top layer (JILL) so moving the eraser over Jill, remove bits of Sam that should be behind her. You do this by clicking and holding the left mouse button. Do a bit at a time as if you go too far over Sam you can click undo!
And finished! You can see Jill is now stood in front of the crayon box, I removed lines from the skirting board and put Sams hand behind Jill to hide the crayon! Just remember the eraser will remove whatever layer you select so if you wanted Jill behind Sam you would click on Jill in the layers panel then erase bits of her that you want behind Sam.
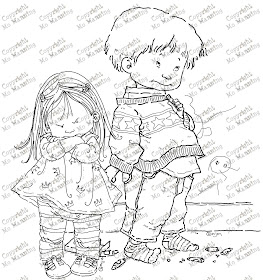
Don't worry if you don't get it right first time, just play and have a go. Remember to use a copy of your images and you can always click undo!
In summary
Open File 1
IMAGE ->CANVAS SIZE
Increase canvas to where you want image 2 placing.
Open Image 2
Select MAGIC WAND and click on white outer area of image 2
SELECTIONS ->INVERT
EDIT ->COPY
Click on Image 1
LAYERS ->NEW RASTER LAYER
EDIT ->PASTE ->PASTE AS TRANSPARENT SELECTION and move into place
SELECTIONS ->SELECT NONE
Click on Layer 1 on layers panel (Background)
Use ERASER TOOL

Thank you, I will definitely have a go at this in the very near future, going to save your tutorial to favs. Then I won't forget it.
ReplyDeleteHugs
Suzi x
This is wonderful! What a great visual tutorial for all us digi stampers. This works awesome in PSE and Illustrator as well, yours came out just flawless. :D
ReplyDeleteWow thanks for the tutorial. Will have to give it a go.
ReplyDeletemwah
Trace
OMG!!!! Do you know how long I have been searching for this info with PSP??? I have found it for every other program BUT PSP. Thank you Thank you Thank you. I kiss your feet LOL
ReplyDeleteNow I havent even read it yet I was so excited when I saw Paint Shop Pro, so hopefully I can do it!!
Hi
ReplyDeleteThankyou so much for this tutorial, its been something I have wanted to do for a while and have no clue!!! and with visual too :O)
I shall most deffo be reading through it again and again.
Joey.xxx
This is fantastic Vix, definitly be trying it out...even though I am computerly useless, I am hoping to have a go...must update my pc though, I was only looking the other day and my Word is from 2003...must get that updated...and try and figure out how to work PS...
ReplyDeleteThank's for the tut...
x
Vicky
Fantastic tutorial Vix
ReplyDeletethanks for sharing darling
Hugs Susie xx
Wow, cann't wait to try it.
ReplyDeleteOMGoodness!! What a great tutorial!! Thank you so much for all the work you put into this!
ReplyDeleteGreat tutorial, thanks for sharing! Take care, ~Diane
ReplyDeleteTerrific tutorial.. Your detail is really great.. Thanks for sharing..
ReplyDeletewow! What a wonderful tutorial. Thank you so much for sharing this. ~Chelsea
ReplyDeleteFantastic Tutorial, will definately be looking forward to trying this out
ReplyDeleteThanks for the tutorial. I don't have Paint Shop Pro, but will give it a try with the program on my computer.
ReplyDeleteThank you, thank you. The illustrations were vital. I'm not nearly ready to do this, but I bookmarked your fabulous directions. At least, I no longer believe it's magic.
ReplyDeleteMinneapple
Woooo - thank you so much. I have been desperately trying to teach myself PSP but failing miserably. Having just worked my way through your fabulous tutorial and having completed my first merged scene, I feel like I could fly! Brilliant!
ReplyDeleteI nwould like to tell you that I haven't got paint shop pro but it works just as well in serif
ReplyDeletepageplus x3 hope this helps
Thank you so much I have been tring to figure out how to do this
ReplyDeleteGot to say Vix! You do write the most amazingly clear tutorials!
ReplyDeleteHugs,
Ei
x
fabulous tutorial, Mo forward it to me. Can do it well now. many thanks. janex
ReplyDeleteAhhh - layers! That's how to do it!
ReplyDeleteThanks for sharing your idea.
thanks, i'll give this a try
ReplyDeleteNice to find lovers of PSP .... there used to be many groups doing tutorials and providing graphics etc online, mostly using Yahoo Geocities Website building, which of course have long gone :( I've done a few myself but there are many on Ytube these days. For those who haven't got PSP - Paint.nett is available and FREE and provides many of the features of PSP. Mo's digis are difficult and\or more or less impossible to give a true transparency background, due to the artwork having broken lines. But WOW they are a joy to work with.
ReplyDelete