We are grateful for our lovely followers

Follow on Bloglovin

Google Website Translator Gadget

Monday, 22 February 2010

Challenge 15 - Tricolour (Based on Colour Theory)

Thank you all so much for your entries to Challenge 14 - Digital Delights. We've seen so many new and different designs along the way!

Thanks again to Nikki from Dewdrop Craftz for being our sponsor for the challenge and also for your kind comments on our digi tutorials. I'd love to see what you've done with your new found skills so let me know so I can come visit!

Also Jenny has decided to step down from the team due to study commitments so best of luck Jenny and thanks for all your work x
********************************************

Onto the winners of challenge 14 (Digital Delights) We had 117 entries so thank you all very very much! Lynn Antill just a note that for some reason your comments have turned spanish or something and it wont allow me to post a comment so sorry, I did try several times!

Random.Org has chosen Number 39 which is Lisa Jane, well done Lisa, please email me to arrange for your digital stamps.

Our Top 3 for this challenge are (and Oh my whirly word was this so tough! Actually I'm going to have a Top 5 for 50 or more entries in future!)
In no particular order are....

Jodi for her Spring Ducks Card
Mary C - Spring Bathtime card
Nikki - Dolphin card

Well done ladies they were outstanding! Please grab your blinkie from the sidebar for Top 3!

************************************************

CHALLENGE 15 - TRICOLOUR (COLOUR WHEEL)

For this challenge it is important you read the COLOUR THEORY tutorial as its not an own choice of colour.

Our challenge this fortnight is to use a Tricolour scheme on your creation based on the following colour schemes.
Triatic

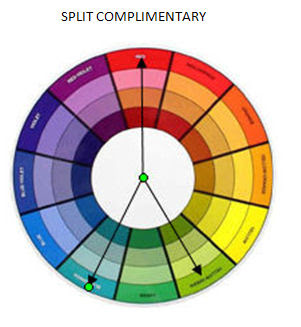
Split Complimentary

Analogous

You can choose any colour combination you like so long as it follows one of the schemes listed. If in doubt please ask!
Please post what scheme & colours you have used on your blog.

TIP! There are a lot of spring challenges around just now so have a dabble with an analogous scheme using green/green-yellow/yellow ;)



We're sponsored again by the fabulous Joanna Sheen. You may have caught some of her create and craft shows recently, I managed to catch a couple and she was fantastic! New in at Joanna's shop are WOW WOW WOW pillar packs of prima flowers, one of them is all white so you can colour them with your promarkers (I'll be there on pay day lol!) and the NEW Martha Stewart "Punch around the page" punches

Joanna is again offering a £10 voucher for her online shop. She has soooo many goodies to choose from too and offers free P&P worldwide! (Excluding certain heavy items)

Here's what we've come up with (I think lots of us loved the purple/green/orange scheme!)

Just a note that Elly & Toria haven't followed the challenge as I didn't communicate to them effectively what was required so I've taken note, slapped my wrists and hope that I've explained the challenge properly here!


Joy


The three colours I decided to use were green, orange & violet.I used a square coloured card and after colouring the outside of a flower shaped pattern I stuck it to the card with double sided tape, I then coloured a digital picture which I had previously downloaded in the centre of it.


This Fortnights challenge is using three colours, well mine are Yellow, Red and Blue (Triatic)
My image came from http://fairycoloringpages.blogspot.com/ - I fell in love with her as soon as I saw her. I used Yellow, Red and a touch of Blue inkadinks mixing them together to get a brown and an orange.

First I made the background paper that she is laying on, using Vixs tutorial earlier on in our Blog. I then stamped out loads of butterflys and coloured them using the same colours but added mica pigments. I have used tim holtz butterflys grungeboard and folded them together to make a bit of dimesion to them. I sat the little butterfly on a handmade flower which again we learned about earlier on this blog. I love this card and it shows how far Ive come from all that i have learned. Thanks for looking guys xx


I have used the colour theory triatic. I started with a standard square card. Chose the three colour sections I wanted to use. The Tilda image was stamped onto a piece of card, coloured with promarkers and cut out. I matted and layered the background papers on top of each other and added the three coloured ribbon, mounted this onto the card, added the coloured image. The flowers are two separate ones held together with two brads, the wording is from a set of rub ons and mounted onto orange paper to match the card. I then added the flowers in the bottom corner and finished the card of with a few gems. Hope you enjoy the challenge as much as I did.


My papers are a free download from Zoe Pearn at Sweet Shoppe Designs, and I've used a free digi stamp from Karen's Doodles, coloured with promarkers. My flower is made with woodware daisy punches, with a button centre and the sentiment is from Craftwork Cards. My '3 colour scheme' is pink, yellow-green and blue-green (Split Complimentary).


For this challenge I have used the triatic colour scheme of Green, Violet and Orange.
I have used a download from Pink Petticoat and coloured it in with Promarkers. I have printed it out 3 times and decoupaged it in 3 layers using 3D foam
The backing paper is by DCWV and I altered the colours of the flowers with a Promarker so they matched the colour scheme better. The flowers have also been coloured to match.
I used a Martha Stewart doily punch to make a black strip and attached spotty ribbon from Docrafts. To finish I added a spot of bling to the flowers on the chair and a sentiment from a magazine freebie.

The three colours I decided to do were Yellow, Green and Purple. I was stuck to what colours to choose until I was given some lovely Yellow ribbon by my mum. So the card had to have yellow on it. I think these colors work really well together and are great for a Easter/Spring card. The image is a digi stamp by Pollycraft and is coloured using watercolour pencils. I mounted her on paper from Daisy and Dandelion paper pack and added some white flower braid. Then mounted on to some lilac pattern paper. I round the corners using a corner punch. I punched a hole in the card and added some lilac ribbon and a yellow bow. I created a pocket, the right size for my card, in the same lilac pattern paper. Using a scalloped paper punch, I cut a small section to help when pulling the card out. I add lilac & yellow ribbon, the same green patterned paper and flower braid to coordinate with my card.

My card for this weeks challenge is using three colours from the triatic colour chart. I chose Purple, Green and Gold. I made this card using the idea of a side stepper card, just moving the folds to the centre, adding a seperate piece of card for the image frame. I stamped around the image to create an arch and made a mask to create the moon, adding a couple of columns stamped and cut out leaving a bit of the card at the bottom to push through a slit and fixed at the back. The image is from Sugar Nellie and the trellis from a keepsake board by The Glitter Girls.

I also went for the purple/orange/green triatic scheme lol! We dont tell each other what we're making as we like surprises so only find out after they're all done!
Image is a Sweet Pea Stamp called september rhythm coloured with promarkers. The flower was punched and I've coloured it myself. I've mounted the image on a frame I tried punching round but I've not long had the fiskars punch (Helen gave it to me!) so don't know how to do corners yet, any tips appreciated lol!
The seaweed is made from starburst stains cut into strips and Ive swiped with brilliance black for more depth.

Have we got a treat for you today! Our special guest designer is new to blogging, she actually started on 15th January and entered our romance challenge and was very very quickly snaffled to be our special guest! Since then she had bagged many Top 3 prizes and has landed a DT spot at Sophisticats, way to go! Tracy is immensely talented so pop over to her blog to see some of her other fantastic creations especially her daughters 18th card.

So without further ado I shall hand you over to the very very talented Tracy Payne!

1. How long have you been crafting & what things do you make?


I started around 4 years I think, but Hubby thinks it's longer? I started making cards and then I moved onto scrapbooking, just so that I could keepsome of my work and so that cherished memories can be passed to my children and their children.

2. You make such wonderfully creative designs, where do you get inspiration from?

My Husband reckons from him.......but I think not. To be honest more often than not I start with a blank page, I never know what I'm going to create. Other times I get an idea in my head, for example I recently made my Daughter's 18th Birthday Card. I wanted to use the Step Card style as I hadn't done that before, but I also wanted to incorporate a large 18. The result is on my blog here.
If in doubt I search the internet/blogs, and generally something will inspire me.
3. What are your favourite materials to work with?

I have a few.... flowers, ribbons, beads, stickles and wonderful distress inks.

4. Do you suffer from cardmakers block or lack of mojo? How do you overcome that?

Not very often, I find getting new stash helps! In the last two weeks I have done a couple of sketch cards, I think these are brilliant if your ever get stuck.

5. Your Top 3 tips

1. When using double sided tape, I apply a glue stick on top, (I useTombow), this makes it repositionable and when dries will become permanent.
2. If you use a wet glue, to keep it ready to flow at all times, place moist kitchen roll in the bottom of a glass/cup and place the glue in upside down so the tip is positioned in the moist kitchen towel. It's always ready to flow when you need it.

3. I buy make-up sponges to use to apply distress inks to the edges of my cardstock, or to achieve graduated shading. They are a lot cheaper!
Thank You Tracy and no doubt we will be seeing LOTS more of you around blogland!

Challenge 14 - Digital Delights & a new newbie!

Wow again! We broke our record again for challenge #13 Hearts & Romance so thank you all very very much for your entries! In total there were 138 so picking a top 3 has been a mission! I've also picked up some future special guests among entries too so watch out for them in the coming weeks :)
Thanks to Joanna Sheen for being our sponsor once again, she's just back from CHA lucky thing!
Thanks also to the totally amazing Chelsea for being our special guest designer. Chelsea has just got on the Magnolia down under design team so well done to her woo hoo!!


********************************************

Winner of Joanna's £10 voucher is.... 77 - Alice


Top 3 Blinkie awards go to....

Debbie - My thread on paper

Susie Lou - Crafty Susie Lou

Josephine - Josephine's Rainbow

Well done ladies, please grab yourself a top 3 blinkie in the sidebar x

***************************************


CHALLENGE 14 - DIGITAL DELIGHTS


Our challenge this fortnight is to use digital elements, be that digital stamps, printed papers or sentiments on your design. So long as you use a computer generated bit thats fine!


I have a tutorial coming up very very soon on how to merge 2 images and also a basics one on resizing in word for people who have never used a digital stamp before. You'll find that here.


We are sponsored for this challenge by Dewdrop Craftz who have an online shop for digital and polymer stamp images. They like to be a little bit different so you'll find manga inspired images through to cute critters. One of my personal favourites is the butterfly swirl as I find her such a pleasure to colour in and practice my blending!
The prize Dewdrop Craftz is offering is the brand new digiz release designed by Tasha of the Sugar Be-Zus which you will find here The winner will receive the whole set of the new release Bees! Fantastic, thank you Nikki! Pop on over and have a peek at the great array of digiz available, there's something for every taste :)

Here's a sneak peek of one of these delightfully cute digital stamps. This one is Baby Snuggles (Go on say it..... Ahhhhhhhh!)


Please post your digital entries in the comments box below and link to your actual project. If you're unsure how to do this there are instructions here

Challenge 14 digital delights closes at 12 noon GMT on 22nd February.


May I also introduce you to our new Newbie Elly! Elly has been making cards for about 6 months but is very keen and not afraid to get stuck in and have a go :) Welcome to the team Elly! Here's a bit about her :)

Elly – I am 58 years young and live in Derby in the UK with husband Gary. We have 7 children between us. 5 are mine 2 are Gary’s. They have all left home now and are doing well for themselves.I have 4 and a bit grandchildren and I took early retirement from work (I worked in the legal profession) so now I have all day to myself to craft. I have always been a crafter of sorts and have in the past doneMachine Knitting which I taught at a college in the evenings. I have done crochet quilling and tatting and also bobbin lace which was so enjoyable. I have also done very fine cross stitch and beading and made some lovely framed wall pictures mainly of fairies and fantasy figures as I love that sort of thing. Six months ago I got interested in card making and the amount of gadgets/card stock and accessories I have collected is amazing !! lol I thought it was going to be a cheap hobby. I have never stopped spending and enjoying every minute of it heheheeee. I was very happy when I was asked to become a member ofCrafty Cardmakers Design Team and look forward to getting to know you all.

And onto the design team creations using digital elements. Thanks ladies you've done a cracking job!


Elly


I downloaded the digi stamp from Fred She Said Designs and layered together. Fixed the digi stamp to white card stock which I had previously scored twice and placed green cs between the score lines. Printed off a sentiment from Word and layered this onto mirri board and matching green cs. Added some gems !! Rounded my corners with a corner punch.


Jack

I used backing paper and images from Joanna Sheen's Jayne Netley Mayhew's Collection CD. I printed out the fishy backing paper and the toppers which I decoupaged. The buttons are from my stash, and I ran a gold border peel-off round the edge of the backing paper.


I used a green card then added the picture of the castle wall, with the drawbridge to the top left hand corner of the card leaving a small green margin at both the top & left hand side, and then added a picture of a dragon ... I coloured them both using watercolour pencils and stuck them on the card using double sided tape, next a coloured the little dragon which I put in the bottom right hand corner using foam pads.


I have chosen Betty Boop as my digi image, have had her a while, so thought this is the perfect time for her. I have coloured her in, using brush strokes, added glossy accents to her hair to make it puff out and added some ultra fine glitter to it to give it a shine. Rooted around in my jewellery offcuts tin and found this little heart and string of flowers. Used My punches to make a border instead of using ribbon.


Digi image challenge, I was so looking forward to this challenge as I love my pro markers at the moment. Thought I would try to do something different to what I normally do and my magazine came with an article on waterfall cards, thought I would give it a go. I am quite please with the way it turned out even though it is my 2nd attempt. It is one of those techniques once you have done one it is easy to do another.


I've used a large 8 x 8 card blank. The dig stamp is from Karen's Doodles, coloured with promarkers and cut out with nestie circles.. Papers are Imaginisce (green) and Bo Bunny (pink & green spots), with coredinations cardstock. Sentiment is computer generated, added fabric flowers, silver bead caps, large green half pearls and pink raffia lace from stash. Used the Bo Bunny paper on the inside, cut with a Martha Stewart doily lace trim punch.


I used an image from Pink Petticoat and printed it out 3 times so I could decoupage certain parts of it. I have coloured it in using my Promarkers and added Stickles glitter glue to highlight certain parts. I have added bling to the flower centres to add a bit of sparkle.
The layout of the card is sketch #69 from Eat Sleep Stamp. The patterned papers are from Doodlebug and Ki Memories and the sentiment is a magazine freebie.
For the insert I have combined 2 freebie digi images and put the sentiment inside the heart frame. There are loads and loads of free digi images available around the net and I hope you will have a go yourself. I use a program called Xara but most images can very simply be printed from Word so you don't need to buy an expensive program to have a play with them.


Toria


Vicky


Our challenge this week is Digital Delight's, I thought this free image by Selina Fenech would be great to practice my copic's, I am no expert with copic's,and sometimes do a bad job with them. My moto lately is if you don't try how do you know if you can do a good job...these pen's take practice and time,there is a lot of help on the net and in blogland to learn how to use them, lately I have really enjoyed seeing people use them in a water colour effect, my attemptshow's how I used several different shades, hopefully with more practice I will improve and feel more confident.


For this challenge I have used a number of images by Dewdrop Craftz. They are Summer Flower Girl, the dragonflies and snails and the fox and chick are from the Animals/Bugs mega pack set.


I used Paint shop pro to create layers and resized the animals and bugs and have added the fox both in front and behind the girl and put the chick in her hand (Its a little bit complicated to explain so I've wrote a photo tutorial which is coming very soon!)


It was coloured with promarkers. I actually coloured her in another colour then found I had no stash to match *doh* Something you really have to retrain your brain to do is to find stash first THEN colour lol! The sky is done with cut n dry foam and brilliance sky blue swiped from side to side, press down harder in some areas for the streaky bits.


All papers are courtesy of my SU Rep Helen who was having a clearout and she also gave me the fiskars scallop punch. The twine is some raffia ribbon I cut down and some I sharked from DD1 who got some flowers from her OH and I kept the twine as I thought it would be useful (smile)


We have no special guest designer for you this time, we do however have 2 tutorials on using digital stamps coming right up!


The first one on resizing your image is HERE

Tuesday, 9 February 2010

TUTORIAL - MERGING DIGITAL STAMPS JPG FORMAT (PAINT SHOP PRO)

Merging digital stamps together is a fun way of getting more of a unique look to your creations. You may have seen some people doing this on blogs and are wondering how its done so I shall do my best to explain! I use an image editting program called Paint Shop Pro (9) I *think* most other packages will work in the same way.
Once you learn the concept you can join as many as you like!


Just a quick note that some digital stamp companies have an angel policy that if you do merge images then you must only use theirs together.

THE SINGLE MOST IMPORTANT POINT TO REMEMBER IS TO MAKE A COPY OF YOUR IMAGE, NEVER EDIT THE ORIGINAL!!!

Simply open your image and press control & c then click EDIT -> PASTE AS NEW IMAGE


There are generally 2 formats of images you may download, one is PNG format and the other is JPG or TIF, they work slightly different so I'll cover both separately. If you don't get things right the first time don't worry just click the back (EDIT->UNDO) button or try again :)
For this tutorial I am using Sam in Trouble and Jill Two by Mo Manning (with permission)
Click the pictures for a larger view.

STEP 1

Working on your copy of your image increase the canvas size to where you want your image to go, here I will be placing it to the left so click IMAGE ->CANVAS SIZE and adjust. It shows the current canvas size at the top so you know how much to adjust by.

You can also create a new image and copy and paste your first image into it.


STEP 2 (Optional)


You can resize your 2nd image to fit. To do this open your 2nd chosen image and click IMAGE ->RESIZE. Here I adjusted to 75%


STEP 3

You'll notice which image to work on by which one is highlighted blue at the top as now you will be flicking between them.

Working on Jill your 2nd image go to your tool menu and click on the SELECTION TOOL. Drop down the menu and select MAGIC WAND as shown in the pic below. Now click on the WHITE AREA next to your image of Jill. This will put 'runing ants' around the image and the page edge.


STEP 4

Next click on SELECTIONS which is on the top tool bar as shown below then SELECTIONS ->INVERT.

Make a copy of this by clicking EDIT ->COPY


STEP 5

Now move over to your 1st image (Sam in Trouble) by clicking on the blue bar above the image. When on this image you need to make a new layer so do this by clicking LAYERS ->NEW RASTER LAYER and click OK.


Next click EDIT ->PASTE ->PASTE AS TRANSPARENT SELECTION and your copied image of Jill will appear on your 1st image.


STEP 6


Your image will be floating so slot it where you would like it and right click your mouse. If you wish to move it again then click on the MOVE tool on the sidebar which looks like a cross above the magic wand. As you can see on the image below the images are over each other but you can still see your 1st image through


Click SELECTIONS ->SELECT NONE


STEP 7


This is the clever bit and takes a bit of practice! Click on the ERASER tool on the side tool bar as shown in the pic below. The eraser menu will appear above the images so look at size, hardness, density etc at the top. Set opacity to 100% and adjust the size of the eraser head, this is trial and error, I chose 18.


You also need to make sure your background colour is set to white which is on the right of the screen (Image below) Click onto it to change the colour. Now working on the layers click onto background (which is your 1st image)

As you have selected background on your layers panel when you erase it will not touch the top layer (JILL) so moving the eraser over Jill, remove bits of Sam that should be behind her. You do this by clicking and holding the left mouse button. Do a bit at a time as if you go too far over Sam you can click undo!


And finished! You can see Jill is now stood in front of the crayon box, I removed lines from the skirting board and put Sams hand behind Jill to hide the crayon! Just remember the eraser will remove whatever layer you select so if you wanted Jill behind Sam you would click on Jill in the layers panel then erase bits of her that you want behind Sam.


Don't worry if you don't get it right first time, just play and have a go. Remember to use a copy of your images and you can always click undo!


In summary

Open File 1
IMAGE ->CANVAS SIZE
Increase canvas to where you want image 2 placing.
Open Image 2
Select MAGIC WAND and click on white outer area of image 2
SELECTIONS ->INVERT
EDIT ->COPY
Click on Image 1
LAYERS ->NEW RASTER LAYER
EDIT ->PASTE ->PASTE AS TRANSPARENT SELECTION and move into place
SELECTIONS ->SELECT NONE
Click on Layer 1 on layers panel (Background)
Use ERASER TOOL

Monday, 8 February 2010

Digital Stamps - Resizing in Word

If you've just bought your first digital stamp or are thinking about it this tutorial will show how to resize your image using microsoft word.

STEP 1 - Open up word and create a new blank document. Click on INSERT -> PICTURE as shown below then select INSERT PICTURE FROM FILE

STEP 2 - Locate your digital stamp on your PC and click OK. Your image will appear in your word document. It will usually be very large (as shown below) as digital stamps generally are for high quality.


STEP 3 - RIGHT CLICK your mouse and select SIZE. This will bring a pop up box up where you can edit your image to your requirements.


STEP 4 - Use the arows next to the height and width or type in what size you would like. You only need to do either the height OR width as it resizes for you automatically (Lock aspect ratio should be checked)


STEP 5 - You're done! Simply print it out or add more images to the page so you dont use a whole sheet on one image.


The beauty of these stamps is that you can make them small to fit ATC's or large to fit a scrapbook. Have fun!
Image used - Catch me Mummy Designed by Tasha Brown for Dewdrop Craftz

Monday, 25 January 2010

Challenge 13 - Hearts & Romance and our new teamie!

Wow wow wow! Thank you for all your entries for our last challenge What's New? Seems like we all had a visit from santa or have (many!) things we've never opened before as we had a record number of entries - 101!
Also a huge thank you to the delightful Tracey Coates for beong our special guest. I'm sure we'll be seeing lots more of Tracey and her designs this year and I can't wait to see what she's got up her sleeve!


Thank You also to The Stampman for sponsoring our last challenge and I hope some of you managed to catch Jill on C&C last week!


The winner of The Stampman voucher is.....


And the winners of the Top 3 blinkie in no particular order are...


Well done ladies! Please grab your Top 3 blinkie from the sidebar :)


*****************************************
CHALLENGE 13 - HEARTS & ROMANCE
Our challenge for you is Hearts & Romance. It doesnt have to be Valentines, it could be a thinking of you, with love etc Nice and easy this one! There is a heart shaped easel card tutorial here if you fancy having a go at that, its simples, promise!


We're sponsored once again by the ever delightful Joanna Sheen who is currently across the pond at the CHA. Can't wait to see what new goodies she brings back! What's new at Joanna Sheens?

"We have a new, beautiful CD called "In Other Words". The illustrations have all been done by Lois Miles and together with a bit of JS Magic there are amazing backing papers and toppers, word cards and stationery sets - everything to make some really fun projects.

There's a video in our video section showing you what's inside the CD and some beautiful samples in a separate video too. This is one of those CDs that you will turn to time and time again for something a bit different and oh so pretty!


We also have fantastic new Country Life rubber stamps - a new format with a very long thin sheet so lots of value and some wonderful scenic stamps! There is a samples video for those too!"


Just a quick reminder - Please follow the challenge and rules. We can only accept up to 3 entries per challenge to make it fair to newer crafters or those who are a bit slower at crafting. Any entries in excess of 3 will be deleted and it does take time checking them all and I know some of you are ever so keen but I have to draw the line somewhere to make it fair to all.

Please leave a link to your entry in the comments box below Chelsea's questions and answers below. This challenge closes at 12pm GMT on Monday 8th February.


We are joined today with a new teamie who some of you might be familiar with :)
Let me introduce you to our latest design team member - Vicky from Kip's Cards! Vicky has kindly agreed to join our merry bunch and we're thrilled to have her! I'll let her start the ball rolling with some examples to inspire you!
Welcome to the team Vicky!


Vicky
First of all can I just thank Vix and the team for asking me to join...I am really excited though a bit nervous, but here goes...This week's challenge is " Heart's and Romance " so I decided to make an Engagement/Anniversary card.I have kept it pretty simple...I think these occassion card's look very elegant in a white theme and not over embelished.I used a decoupage sheet from craft creation's, after cutting and assembling with silicone I sprayed the image with a gloss varnish.Nestie's, Martha Stewart punch, ribbon and a Jewel flourish to finish...oh and a bit of antique linen distressing ink that I added sparkle to with ultrafine glitter.


I had a plain cream card blank and I matted dark brown card on to this. I then mounted a piece of background paper I had made myself by sponging distress inks onto copier paper (antique linen, weathered wood and vintage photo). I then crumpled the paper up, opened it out and swiped lightly over the top with vintage photo distress ink. It gives a lovely marbled look. The main image is from the Elusive Images set Paris Postcard which was stamped in Distress Ink onto parchment coloured paper with Vintage Photo. I tore the edges and then rubbed them with Weathered Wood, then rolled one corner. This image was mounted onto dark brown card with a piece from a french novel underneath. The Paris ticket and Ooh la la! also came fro Elusive Images, again stamped with Vintage Photo and dabbed with weathered wood. The ribbon was once white but, again (lol), coloured with Vintage Photo. The flower was made by stamping flowers in two sizes in Vintage Photo (stamps by Artistic Stamper - Flower Power) onto to paper from the Paper Cellar (Victorian Classics Pad), dabbing with weathered wood and antique linen, curling the edges and sticking them together


I used a pale green card and then in the centre of it added a square of silver textured paper and added a circle of bronze coloured paper and arranged 4 different coloured hearts so that the points at the bottom of each of them was on the circle and the top of the hearts were in each corner of the square paper, next I added two small strips of double sided tape to the circle and added the top layer of heart shaped pieces so that they are in line with the first layer, next I added four larger heart shapes to each corner of the card & finished it with a "With Love" sentiment & a circle of silver glitter glue to the centre of my Heart Flower.


Judie


Hi guys, this weeks challenge is hearts & flowers, now as everyone knows im not to good with the colour Pink and Red, so i have gone the opposite way "BLACK" - I have tried to create a classy card - I used a white card with black and silver hearts backing papers, distressed the edges with black soot. Made my on sentiment as it means more to me, done with black card and silver pen, added some silver corner pieces that i have been harbouring for far to long !!! I used a couple of red flowers and made some black leaves and added some keys attached with a red brad. Hope you like it, thanks for looking xx


I have made a simple card for this challenge, with simply matting papers and using stickers. I think it just shows that a simple technique still makes a nice card.


I used sketch # 150 from CPS for the layout and was initially inspired to incorporate the packaging from some Papermania spotty buttons that I had bought to make a shaker card.
The heart paper is an old HOTP one. The red paper and letters are from a freebie paper pack from a magazine. The Forever Friends bear is a sticker and the flowers are various Primas layered together with a silver beadcap and a spotty brad on a Sizzix diecut corner.


Mine is a heart shaped easel card which I did freehand. Part the way through I thought hmmm I could write a tutorial on this so thats what I've done HERE! The image is from My sentiments exactly and I've had it a loooong time. Its stamped and embossed on distress ink background (tutorial for that is here) To make the colours more vibrant I rubbed essential oil over the ink (so it smells nice too!) Image is coloured with promarkers and papers are DCWV and HOTP. The writing in the heart is done with Moonshadow Ink and a fountain pen :)


Now let me have the pleasure of introducing our special guest for you for this challenge who is Chelsea from Crafting Life's Pieces.


Chelsea first came to my attention when she entered our challenge 9 with some jaw dropping work. I had a good look round her amazing blog and saw she was uniquely talented, she doesn't make cards, she makes masterpieces, each one a work of art. I asked her there and then if she'd like to special guest for us. Pop over to her blog, you wont be disappointed!


Chelsea also has her own range of stamps - Gurlee Girl which she has used one of them on her design for us. Thank you Chelsea!


SPECIAL GUEST DESIGNER - CHELSEA - CRAFTING LIFE'S PIECES


Our questions for Chelsea....


1. How long have you been crafting and what kind of things do you make?


I have been crafting since my high school days. I enjoy making cards and scrapbook pages.


2. What are your favourite materials to work with?

I have a couple of those! First would have to be papers, flowers, lace, and charms. Other favorites includes paper punches, chalk ink, ribbons, and my sewing machine.


3. What do you most love about your craft(s)?


I love the fact that I'm able to bring my ideas on to paper. It's one thing to see it in your head, but it's another when the completed project in front of you.


4. What are your achievements and future plans?

My biggest achievement was launching my Gurlee Girl stamp line back in July 2009. I look forward to adding more cute images to my collection and expanding my online shop.


5. Your top 3 tips


1 - store your ink pads and pens with the tip down


2 - add chalk to the back of the sticker where you don't want it to stick...did you get that one? :)


3 - to keep your scissors sharp, cut through a piece of foil

EMAIL ENTRIES

By Carol G (25th Jan @ 20:43 - Entry No.4)