We are grateful for our lovely followers

Follow on Bloglovin

Google Website Translator Gadget

Monday, 25 July 2011

Challenge #50 Flutterbies!

Good Evening and welcome back for another challenge at Crafty Cardmakers!  Firstly thank you for your fantastic one layer card entries, they really are amazing!
Our next challenge for you is by Gill and she would like to see BUTTERFLIES somewhere on your creation! 
Crafty Cardmakers is going on holidays over summer so we'll be back on Monday 5th September with our winners and new challenge!


We're sponsored by The Stampman for this challenge and you could win a £10 voucher to spend in their store and it is jam packed with tons of crafty goodlies to suit all tastes.  They also have their own fantastic range of stamps so please do go check them out.

Here's the teams creations to inspire - I'll add mine in the week when OH back home and my lad stops the meltdowns :/

Have fun & enjoy!


these two cards i have made with my new set of spellbinders the backing paper on the first card is from craftworks with a light embossing on it. edges cut with MS punch mat sentiment tag and flowers and butterfly cut with spellbinders. i inked them with sir tims distress inks while still in the die it's quite effective.
on second card all embelishments made in same way but the BP is whitewash coredination card debossed with the new sizzix letterpress boards again using distressed ink before putting through my vagabond


for my butterfly card I have gone with a MCS image and cut the butterflies out a couple of times and glittered the top ones to give a sparkly effect


The butterfly is a digi from Delicious Doodles which I've printed and coloured with Sakura Stardust pens. I made the paper to match using Photoshop Elements. The border punch is Martha Stewart, the flower is from Prima and the gem is from Poundland and coloured with Promarker. The flower was coloured using Twinkling H2Os.

The butterfly and bird acetates are by K&Company, sentiment is a preprinted one by Anna Griffin.


The background paper is from an 8"sq. pad, but I'm now not sure which company. I stamped the butterflies, onto red vellum, each twice, the first one being stuck to the main card, the second of each are only stuck at the body section, so they appear to be in a flying position. The Tattered Butterflies stamps are from Personal Impressions designed by Lyndsay Mason.

Fiona


For my butterfly card I have used my new stamp called "Daisy with flower bouquet #2" from In2Stamps,
I have paper pieced her dress from dotty paper and coloured the rest of the image with ProMarkers. All of the papers are from the Prima Jack and Jill collection. I used my martha garden trellis punch and a craftwork cards sentiment, and finished off with some butterly peel offs (one coloured in with sakura pens) and some stickles.


I've chosen Tilda this week to assist with my butterflies! Both she and her dog have one and there are several fluttering in the meadow behind them! In case that wasn't enough, there are two die-cut butterflies crusted with stickles top left and a goldtone charm.
My lovely fabric-look papers were from C&C, believe it or not, one of their rare bargains.
You can't see much of the base paper, which is a shame because it's quite lovely, with fairies, butterflies and pink bindweed on a textured ground.
I coloured Tilda, her dog and the meadow in a mix of Copics, Marvy-le-Plume and Stickles!
Hugs.


For my card I got out my Sweet Pea Stamp Dance with Butterflies and coloured the image with Starburst stains, Sakura Stardust pens and Whispers pens so it's got lots of sparkle. My papers are all from K&Co and my butterflies are Cuttlebug Cut and Emboss dies .


As this my choice of theme I decided to go with something I LOVE! So BUTTERFLIES it was!
I decided to try my hand at a wee stepped card and wanted to use my new Magnolia Butterfly coloured with Promarkers! The Papers are Bo Bunny, inked at the edges with distress ink. I used my nesties for the wee centre frame, added flowers from Wild Orchid and lots of giller to finish!

Lin
I started with a piece of blank white card and ink dusted some Big N Juicy ink across it. I then stamped the gorgeous large (almost 6") butterfly from EI in versamark ink and embossed it with Sheena WOW sparkly powder. The BP is from EI from the Graphicus Guild welcome pack. The lace I dyed to match and the flower was from my stash. The little purple bits are various Marianne diecuts and the sentiments is also from EI from the same sheet the butterfly came from.

Sarah W

I have created this card with a resist technique using adirondack inks and a brayer and a butterfly stamp I picked up a while ago. I am not sure what the other stamps are either as I borrowed them at the craft day I went to. The butterfly is made using the same colours in alcohol inks, stamped onto card and cut out to give a 3D effect.


My card has been made using digi's from McMahon Five Designs coloured with Promarkers. Main background paper is from DCWV and the glitter embossed spotty paper is from My Mind's Eye. Scraps of paper and cardstock have been punched with an MS punch and all mats are raised with 3d foam. The wings have been gently curled and a little Sakura glitter has been added.


Lisa
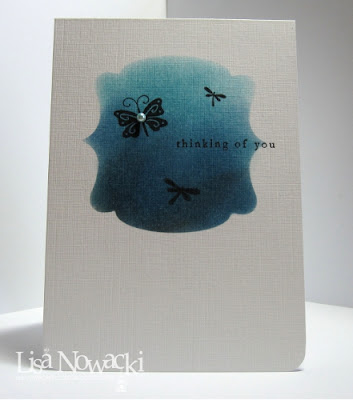


I cut a frame using a go kreate die, then used this as a mask to sponge distress inks through, using 'broken china', 'faded jeans' and 'black soot' inks.  The butterfly and dragonfly stamps are from the Penny Black 'salutations' set and the sentiment is Stampin' Up.  Added a pale blue pearl to the butterfly.


Monday, 11 July 2011

Challenge #50 One Layer Card

Evening All and welcome back for another challenge at Crafty Cardmakers!  Thank You sooo much for your fantastic entries to our Spots & Stripes challenge, a popular choice (one of my favs too!)  We had some fantastic entries and glad you enjoyed as much as us!

CHALLENGE 50 - ONE LAYER CARD

Lisa has chosen the theme for this fortnights challenge and she would like to see One Layer Cards - Now the definition of one layer cards is "One piece of card folded in half with no additional layers and minimal embellishments, where the image is stamped or printed directly onto the cardstock." (Definition from Less is More Blog)


We are sponsored today by ONE STOP CARD CRAFTS who are offering a £10 voucher for their store as a prize.
At One Stop Card Crafts we have a big range of ever changing discount making and card making craft supplies.

We are always adding to our range of craft supplies which are ideal for making handmade greeting cards, do-it-yourself invitations scrapbook pages, altered items and much more.
Our card making craft supplies include free UK postage, our popular discount scheme and quick service means our customers keep coming back for more.

Our prices are very competitive and this & makes us an ideal place to buy your card making supplies online. Some of our new products include Petaloo flower layers, Ranger Glitter Glue and Martha Stewart Punches. We also host a regular challenge at http://onestopcraftchallenge.blogspot.com/


Over to the team and they're inspiring creations - Note some were as terrified as you so havent they done well!

Lisa


One layer cards used to terrify me, but I've made quite a few now and quite enjoy the challenge!  I've dabbed distress inks (Broken China, Shabby Shutters & Faded Jeans) directly onto an acrylic block, sprayed the block with water and then used it as a background stamp.  Dried this with a heat gun, then added a Flourishes stamp using memento 'paris dusk' ink, the sentiment is from the same set and was also stamped in 'paris dusk'. Cardstock is white linen from Papermill Direct.  I also lightly sprayed over the stamped area with iridescent 'spray & sparkle' but it's not showing up in the photo.

gill


i think this is first time i have made a one layer card as i am a bit of busy card maker.
i chose to make my card in landscape for a change and felt it suited the layout better. the poppy stamp is a foam stamp from la pashe coloured with prmarkers. the wording is from a set i have had for years can't remember who they were made by. butterflies are from one of my flower fairy sets. hope you like it. i have drawn an embossed line all the way around the card edge but it doesn't show very well on photo.


Tracy


This is the first time I have ever shown a one layer card I have made as I find this style really difficult, I also want to add things, I would normally have decoupages the footballer and the ball but I resisted this time. This was for one of the men in the family who supports a team who wear red I used some ink to watercolour the red sections.


A single layer card is likely to be a fairly simple design, so I decided to make a sympathy card. The image is from The Creative Mind of Sylvie and it was a freebie from her a while ago. I changed the image colour from black to a dark grey to soften the effect, then framed it with a feathered gradient border and added the sentiment. I then printed the result and coloured the flowers with Promarkers.


                                                                         Jacki

For this challenge I have done 2 cards (making up for one I missed lol) anyway the top one is using a Debbie Moore stamp coloured with PM's and glitter and some peeloff boarders and gems the sentiment comes from same stamp set
The second one is also a one layered card but just wanted to show what you can do with some graphic programmes this is all done on My Craft Studio and the art work is also from there and yes it's only one layer everything has been printed straight onto the card itself hope you like them xx


The main image is by Paperbag Studios, the script and word 'Beautiful' is by 7Gypsies.


Wow....I found this challenge exactly that!! A real challenge, quite scary lol. For my one layer card I started by punching the bottom of a white card with my MS Lace punch. I then ripped 2 long pieces of masking tape in half. I placed the masking tape down in the rough shape of a square and inked the square with my tim holtz ink. Then I used my Kanban stamp in the middle of the square. I made a mat of paper to cover the square and the sprayed over the whole card with pearl shimmer spray. Then to finish it off I added gems to the image and made a border around the square with stickles.


I found this quite challenging too - I've only made about six single-layer cards ever!
For this one I dusted off one of my very precious D.Morgan stamps from, the
 now-defunct,  'Stamps Happen' rubber stamp company.

The nature of the one layer card is that I couldn't use my normal Copics-friendly card as it's too light to stand unaided as a card and the uncoated stock card does not like markers - they bleed all over the place - so I masked and airbrushed the background, sky and sea and used my Lyra pencils and Sansodor for the house and the green border.


For this wee challenge I stuck with a simple cream care and image!
I coloured the Tatty Button Toadstool Retreat stamped image with my promarkers, added a wee ribbon some gems and a sentiment! Simple but really striking if I do say so myself!


Not the best pic in the world, sorry. I cut a rectangle in a sheet of paper and used it to mask a scalloped edged card which I then inkdusted with Big N Juicy. Then I stamped the Kanban image onto it and embossed it. I bleached out the woman and flowers and finally coloured them in with Cosmic Shimmer paints. The sentiment was added by putting it through the printer after I finished, a scarey moment! In future if I wanted to do that I would print first and design second, or use safmat.


Although this is not my usual card style, I really enjoyed it. I inked the edges with Spun Sugar and Dusty Concord. I then stamped a Kanban image in the left hand corner and over stamped a LOTV sentiment. I just could'nt resist adding a couple of tiny black gems in the top right hand corner. This is something I will definately be trying again.


Sunday, 10 July 2011

Winners #45, 46, 47, 48

Helloooooo!  We're back catching up with our winners!  One of the teamies was taking this task over but sadly she's unwell and has gone off sick so we're catching up again.  So without further ado our winners are....


CHALLENGE 45 - STEAMPUNK hosted by Ei and winner of ONE STOP CARD CRAFTS £10 VOUCHER

Random winner - #29 - Hazel


Top 5 -


CHALLENGE 46 - EMBOSSING Hosted by Tracey and winner of a JOANNA SHEEN £10 VOUCHER


Random winner - 53 Marianne Mail

Top 5 -


CHALLENGE 47 - LOVE THE LASTING KIND (Set by Benita who moved not just house but countries lol!) THE STAMPMAN £10 VOUCHER

Random winner - 3 Lynne in NI

Top 5 -


CHALLENGE 48 - ALTERED FOOD CONTAINERS (TO FOLLOW) Hosted by Sarah


I'll post Sarah's winners as soon as I get them!  Well Done all, please grab your badges above and winners email me your deets!

Monday, 27 June 2011

Challenge 49 -Spots & Stripes

Afternoon everybody!  Are you enjoying the sunshine?  Been lovely here so hope it lasts :-)

Thank You very much for your fantastc altered food container entries, Sarah will be picking the winners soon and will be posted as soon as I can.

We have a new challenge for you this fortnight and its an easy peesy one set by Donna who's like to see SPOTS & STRIPES somewhere on your design.  Remember to read the house rules before entering as we have a cap on 10 challenges sorry! 

Up for grabs is a prize from our regular sponsor ONE STOP CARD CRAFTS


At One Stop Card Crafts we have a big range of ever changing discount making and card making craft supplies.


We are always adding to our range of craft supplies which are ideal for making handmade greeting cards, do-it-yourself invitations scrapbook pages, altered items and much more.


Our card making craft supplies include free UK postage, our popular discount scheme and quick service means our customers keep coming back for more.
Our prices are very competitive and this & makes us an ideal place to buy your card making supplies online. Some of our new products include Petaloo flower layers, Ranger Glitter Glue and Martha Stewart Punches.

Over to our fabulous girls and their makes!


As it was my turn this week to choose a theme I decided to go with something that I'm sure we all have in our stash. Something spotty and stripey. Be it papers, an image, embossing folders etc. For my card I made a base using Martha Stewart Cherish PATP. I used a gorgeous Sassy image and coloured her in with Promarkers and Derwent pencils, blended with Sansador. The papers I used were a freebie from a mag. I cut out the image using Spellbinders Labels 20 & added some eyelets and ribbon. I added some flowers made from an x-cut puch and added some Craftwork Card Candy, a charm, some gems and Martha Stewart butterfly.


spots and strips used an old sizzix die that i have had for years but never seems to go out of date. cut the dress out in several colours then pieced together.backing card was from qvc. punched centre border with martha stewart punch then just added a circular sentiment quick and simple card


For this challenge, I decided to try some digital paper-piecing. The image is from Lillyboo. I put together three patterned papers using 'sunflower' colours in Photoshop Elements, and then digitally cut pieces to fit the carpet, walls and bean bag. After printing, I coloured the rest of the image with Promarkers, The side panel and flowers use Coredinations card which I've embossed using a Cuttlebug folder and sanded. I cut the flowers using a Spellbinders die, and the leaves are punched.


I recently bought a pad of colourful papers, which provided the spots and stripes on my card. I’ll be hiding this one away from my OH. I’ll keep it for his birthday. A die cut oval, with the dreaded peel off to give contrast. I stamped the golfer from the Flippen Men series. I coloured him in, using Promarkers and watercolour pencils. I hope the glisten, with glitter glue shows on his glass of beer.


Well for my card I used a sketch for the layout papers are from my stash and digi is one I have had for a while believe it or not this is the first time I have used it she is coloured with PM's the paers inked round edges and the flowers are foam pre cut ones just layered up loved making this card though thanks Donna


For my spotty/stripey card I have used my Tatty Teddy stamp coloured with PMs .The DP are also tatty teddy and the stripey bit is from a forever friends paper pack. I have used my Martha Stewart deep edge punch and some spotty ribbon. The flowers are from Bo Bunny,sentiment from Craftwork Cards and little heart pearls are from my stash.


I made a little card for a friend using some of my new papers!
I stuck with a basic wee layout using my new echo park paper punched with my Martha Stewart Punch. I used a wee old image I've had for a while coloured with promarkers, added some ribbon, gems and used my new Rose dies for the wee flowers. The sentiment is a C.C Designs stamp.


Ive used Basic Grey papers, Art Journey stamp and a spotty ribbon!


My card has been made using the Mr Gnome digi from Digital Delights by Louby and the sentiment is from Tiddly Inks. The spots are a red and white ribbon that had been laid in stripes on white card. I have also used a striped paper from DCWV to mat the main image onto.


I often use spotty and stripy papers on my cards, so I thought I'd try something a bit different and create my spots and stripes using distress inks instead.  The spotty background was made with a Penny Black stamp, and I made the stripes by masking sections off with post it notes and then inking.  The main image and sentiment are Flourishes stamps, all cardstock is Stampin' Up Kraft card, all stamping/ inking using Brushed Corduroy distress ink.


Eiglas


I would never normally combine spots & stripes per se as I usually have quite a fussy style to begin with but I may just try this again!  I had a slight problem with my glue not setting - probably the heat - so I didn't quite do everything I wanted to do with this card. Papers are DCWV and a doily, flowers a mix of Prima, Wild orchid and poundshop.  The image is my own Eiglas  'Un bon repas pour deux' coloured with my Copics.


For this I used a lovely free image by Sureya who has an open colouring book over on Deviant Art coloured with promarkers.  Papers are digital from bearly mine, flowers were from qvc, metal sentiment I've had forever!


Monday, 13 June 2011

Challenge 48 - Altered food containers

Good Evening!  Apologies for my lateness!  I usually prep the post the night before but my wifi went down so thought I'd do it this morning but have a very sick lil girl who's finally gone to sleep - what a day!


Thank You for you Love the lasting kind entries, winners will be announced soon when Benita has chosen.  Onto todays challenge which is sponsored by Joanna Sheen who is offering a £10 voucher to her online store which is crammed full of goodies and lots of sparkly things!

Sarah has set the challenge today so I shall hand over...

CHALLENGE 48 - ALTERED FOOD CONTAINERS/BOXES
It's my turn here at Crafty Cardmakers to come up with a challenge, and they say to take inspiration from something you love, and I love food!  I am surrounded by lots of inspiration in my evening job, and one night, whilst folding boxes I came up with an idea that one of the boxes we use to serve up combos with would be perfect for a makeover.  I painted it with white acrylic paint, then waited for it to dry before overspraying with  Adirondack color wash, then when that was dried, stamped over it with a variety of swooshy stamps using Stazon ink.  It has two holes for dips which are perfect to put tealights in (the battery operated kind unless you want to set fire to your box lol) and lined with shredded tissue paper, it is perfect as a little gift box.  I have placed a tealight garden hanger in it, but with a little modification and maybe the addition of a mirror to the lid, it could be used for keeping make-up or jewellery in.  Or anything at all which you want to give as a gift!

Here's what it looks like closed:


And open to show the goodies inside:


I really hope you have as much fun as I did on this challenge - I can't wait to see what you come up with!

*Hugs*  Sarah xx
Tracy


This was a box holding those little thin biscuit sticks covered in chocolate which my DD loves. She also loves painting and bought a set of the Paint Fusion Stamps, so we had a go together with no DVD to watch either. The daisy on the front of the box is my attempt so all you fab painters please don't laugh too much. I painted the box with a couple of coats of acrylic paint, painted the inside as well as I didn't like the grey cardboard showing. I took the lid and cut some holes for the new paint brushes to sit in. My DD loves it and I was really pleased with it when I was finished.


My altered box started its life as a yellow box from handmade chocolates. I covered the lid and the main box with some flowery dps and lots of tacky glue. I added a long piece of lace all the way around the box and lots of blue gems. For the lid I die cut the mats and letters out of pearl and glitter card. I added WOC roses and leaves,Zva Creative gems swirls and a butterfly that I made from a punch. Finally I added lots of stickles to the roses to complete my little box of secrets (which will most likely be my new hiding place for my secret stash of choccy! lol)


For my altered food container I decided to make use of a cheese triangle box. I thought it would make lovely storage for my pins. After taking off all of the original design, I coloured around the the edge of the lid using a Promarker. I punched some copier paper using a Martha Stewart punch and pleated it around the side, then added a strip of contrasting paper over the top. I then layered up a couple of circle nesties using foam tape and stuck them onto the lid. Added an Humphrey's corner image, which I coloured with Promarkers. Then I added some letter tiles and Martha Stewart flowers and butterflies. Some card candy and gems to finish.

Lin


For my altered food container I started with an Asda Hero Puppy Pouch box. I first painted it with white paint, no idea why cos I ended up covering it in Bo Bunny paper. I wrapped a long length of white stretchy lace fabric around the middle and also a length of purple satin. I made a couple of bows from the satin and stuck them in the centre of the ribbon. Some Tim Holt diecuts and a few petaloo flowers finish it off. I am using it for storing my Bigz dies, as currently they are inside a zipped container and I can normally not be bothered to drag them out, perhaps I will be encouraged to use them more now.


Jacki

now this is something I don't do alter stuff I just don't know where to start so I really admire any one who does altered art as a craft so what did I do I altered a viennese whirl box cut it down to size to make a thing called a hug in a box I have only ever done it once before and that was with one of those large match boxes so this is quite a bit bigger than the other one I used a precious moments digi for the front coloured with PM's and the verse you can get from google if you just type in hug in a box verse I got the I dea from ally at stamp away ages ago and it was the only thing I think of told you I was no good at this altering thing

Melly

I took a old jam jar and made this


I wanted to do something totally different! So after sitting staring at the jam jar for hours I thought it was starting to look like a toadstool(too much staring and thinking)! So white paint, flowers, glitter and fimo at the ready I made this wee toadstool! It needed something else so the lil fimo princess was made from following a sugarcraft book!

Jenni


I used a soup can for my altered food container project, after having the soup for my lunch today :o) I washed and dried the can then painted the rims top & bottom with alcohol inks, I then cut a strip of DP to cover the can and stuck it on with double sided tape. I added a border at the bottom and then made 6 grunge paper roses with leaves using a Marianne Creatables die which I painted with Twinklin H2O's. After sticking the roses on I coloured the Meljens image and die cut the cardstock and a piece of grungepaper which I coloured the same as the leaves to mount the image on. A few random flowers, some ribbon and other odds and ends finished it all off.


Fantastic samples girls wow!  There's a wide range of things you can alter as the girls have shown so take the plunge and have a go especially if you've not tried before x